

That is why the desktop computer needs to be clean regularly. Also cleaning it regularly will help to reduce the noise production and the vibration as well.So here i will teach you how to disassemble then reassemble your desktop computer.
But before that we need to have a little knowledge about the hardware components of a computer.
A normal desktop computer basically has the following components.

1. The Casing : As the name suggest, it is the body of a computer which holds all the hardware components together. The picture at the left is one of the commonly used casing design all over the world. The resulted component after placing and joining all the hardware components like motherboard,RAM, DVD drive etc is known as CPU(Central Processing Unit). So the casing in your home is commonly called CPU.There are front panel jumpers inside that are connected to the motherboard.

2. Motherboard : It is one of the main component of your computer. It looks like a board and connects all the hardware components with each other so that they can perform the work they are supposed to do. There are ports and sockets in the motherboard and the hardware components are placed in their respective places.

3. RAM : RAM(Random Access Memory) is a temporary memory of your computer where the working files are stored. A common RAM looks like the picture in the left side and is placed in the specific slots of the motherboard.

4. Processor : It is the brain of your computer and is placed inside the CPU socket of your mother board. I do not recommend you to remove this component because if you misplaced without noticing the alignments then it will damage your computer.


5. Cooling Fans : Like the name suggest these components help your computer to reduce heat. A CPU fan is used on the top of the processor in your motherboard to reduce heat of the processor. Their may also be another fan known as the system fan that helps to reduce the heat inside your casing. These fans may be at the back or at the side panel of your casing. A normal computer have a CPU Fan but i recommend you use a system fan as well. A CPU fan is given a steel structure below to focus it's suction and cooling capacity at a point that is the processor but the system fan and sometimes also called a casing fan is not given such structure.The first picture is of a CPU fan and the second one is of the system/casing fan at the left.These both fans are connected to the mother board.The system fan can also have another cable so that it can be connected to the power supply.

6. DVD Drive/Optical Drive : As the name suggest this one is the DVD ROM of your computer.The optical drive may also have a floppy disk drive but nowadays that is not used more often.This drive can be either SATA or PATA. SATA drives are the recent ones and are better then the PATA ones. SATA drives have a red data cable and a power cable but PATA have a thin broad cable known as IDE connector and a power cable.The first picture is of PATA DVD drive and the second one is of the SATA DVD drive with their connectors.The data cables are connected to the motherboard where as the power cables are connected to the power supply.

7. Hard Drive/ Hard Disk : This is the permanent memory of the computer that stores data and the operating system.This can also be of SATA or PATA. It has a data cable or a IDE cable that connects to the motherboard and a power cable that connects to the power supply.
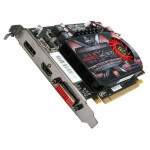
8. External Graphic Card : This is the upgraded graphic memory of the computer.They are placed in their particular slot like RAM in the motherboard and may have their own cooling fan.

9. The Power supply : As the name suggest this component supply power to your computer.It consists of different cables that are connected to the hard drives,motherboard,external graphic card,DVD drives,cooling fans etc to supply power. It also has its own cooling fan inside.
These are the normally found hardware components in your desktop computer.There may also be the external sound cards and other upgraded hardware components but they are not often used and are not included in this article. Now that you have got a basic knowledge about the hardware components inside a computer, you should be able to disassemble your computer.
Now unplug all the power cords attached to your desktop. Remove all the connected cables behind your CPU and take your CPU to an open place because during cleaning there will be a lot of dust coming out from it. Now get a screw driver and open the side panel of your Casing that has holes on it. I mean open the side that has holes on it.
Now you will be able to see what are the components i was talking about earlier right before your eyes. Watch each components carefully and compare them with the ones i was talking about.You don't need to disassemble all the components but just few of them.You will see lots if cables and wires but do not get nervous,So here are the steps :
1. You will find a large 24 pin power supply cable connected to your motherboard. Slowly remove it from the motherboard. Now remove the power cable connected to your CPU fan and if any the system fan as well.
2. You will also find the power cables connected to the optical drive and the hard disk.Remove them as well. If you have an external graphic card and sound cards then they might also be connected to the power supply,if it does then remove them as well. Basically what we are doing here is that we want to take out the power supply to clean the fan inside. So remove all those cables connected to it.But REMEMBER HOW AND WHERE THEY ARE CONNECTED in your motherboard.You have to remove the screws to remove the power supply from the casing.Remember how it was placed in your motherboard and how it is faced upward.
3. If all the cables are removed from the motherboard then remove the power supply from the casing. Remove the CPU fan as well. To remove it just unlock the lock in it's four sides clockwise or anticlockwise which is mentioned in the lock itself. Do this slowly otherwise you may break the locks and may damage the fan. You also need to remove the small cable that connects it to the motherboard. Remove the system fan as well and if any the casing fan too. Be careful while removing these fans and remember where they are placed and connected.
4. If you have an external graphic card with a cooler then remove it as well.But first read it's instructions manual from it's manual book.Now that you have removed the power supply and the cooling fans, you do not need to remove other components from your CPU.But if you want to learn to make your own computer then feel free to remove the data cables connected to the motherboard. But you might need to remember the front panel connectors that are connected to the motherboard. These front panels connectors are the ones of the Casing that helps your PC to power on and restart pressing the buttons on your casing. I don't recommend you to remove these cables unless you remember how they are connected. I mean to say that these jumpers have positive and negative wires so you need to connect them properly or your computer may damage.For this information you need to consult your manual book of motherboard or visit it's official website.
5.Now you need a soft middle sized painting brush sort of like in the picture below and BLOWER as well. If you do not have a blower i recommend you buys one but still if you do not want to buy then the brush can do it's work but won't be as good as the blower. Use the blower to blow all the dust you will see in the cooling fans.You can remove the metal structure of the CPU fan for thorough cleaning. Check whether the fans are rotating smoothly or not. Use the blower inside the power supply to remove the dust particle in the fan inside. You can also use the blower to blow the dust particles inside your casing. But if you do not have the blower then you have to remove all those dust with the help of the brush and blowing through your mouth. NEVER USE ANY SORT OF LIQUID SUBSTANCE to clean any component of your CPU,it will seriously damage your hardware and you might have to spend a lot of money to get it back to work. So better not use any liquid to clean your system.


6.After blowing every components, clean it using the brush again so that no more dust is left on the surface.You can also clean your motherboard using the brush slowly and carefully. Leave the components for a while then be ready to reassemble them again.
7. Now that you have cleaned your PC be ready to reassemble it. First place the power supply in the casing where it used to be in a right faced position and tighten it using the screws. But remember DO NOT OVER TIGHT THE SCREWS otherwise the screws will get loose.
8.Place the metal structure of the CPU fan like it used to be and then place the fan on the motherboard. Slowly press those four locks down and lock them like before.Place other cooling fans in their position and fixed them with the screws from earlier.Place the graphic card in it's rightful position as well.
9.Now that you have placed every hardware components in it's own place, it is time for joining the cables.Now you have to be extra careful here.First plug in the 24 pin power cord in the proper orientation. This plug has a little lock which fixes only when you plug it right.So be careful how it should be plugged there. Now plug the cooling fan power cable as well. While connecting the power cords of hard disk and DVD drive you need to read the numbers on the cord. These four pin cords have number 1.2.3.4 so you need to orient the cables in such a way that these numbers match with each other. I mean 1.1, 2.2, 3.3, 4.4....otherwise you will short circuit the board so be extra careful here. Plug in the cable of CPU fan in the motherboard. Plug the cables of the graphic card as well.
10. After plugging every cables recheck the orientation to make sure that there are no any cables connected in a wrong fashion. If the result is good,close the casing with the side panel and tighten the screws. Take your CPU to it's rightful place and join the power cords in it's back.The mouse,keyboard,VGA cable,audio jack,network jack,the power cable should be connected to their rightful place.
11. For cleaning your monitor screen, you need to have a special liquid made just to clean a monitor screen, i recommend you to buy one because this liquid will not harm the pixels of your screen as it is made for this particular propose. You need to clean your keyboard and mouse as well. It is said that many bacteria and other harmful germs find keyboard to be a nice place to survive so it is a good and healthy idea to clean your keyboard regularly. To clean a keyboard and mouse, take a piece of clean cotton cloth, take about 150ml of water then add about 20 drops of antiseptic liquids like Dittol in it, wet the cotton cloth in it then wring it, now clean the keyboard and mouse using the cotton cloth properly. But REMEMBER not to use excessive water in the keyboard or mouse. When you are done cleaning leave the keyboard and mouse for a while so that it will dry itself. Now attach them to the CPU like before.
Now, power on your CPU and see the results for your self. The noise and the vibration should have been decreased now.More importantly your computer will not get any heat problems now. But remember you should clean your desktop computer regularly.
If you have any problems or get any problems anywhere then you know it.......I am always here to help you. ^_^
How regularly should I clean it. Like maybe once a month or six months?
ReplyDeleteWell that depends upon how much dust particles you find in your CPU when you first opened it.If the room has more dust then it's obvious that your CPU will also suck in more dust.But normally cleaning the PC once a month is recommended.If you find an increase in the vibration and the fan noise with an increase in the heat in your CPU then you need to clean it right away.Analyze how much dust is collected in your CPU in about a month then you will find the right time to clean your system ^_^
DeleteCool thanks :)
ReplyDelete